Doubles Competitions for Club Admins
Setting up a Doubles Competition
Note before starting
An event cannot have both singles and doubles within it. For a combined event with both types of draws, use the Singles guide.
Doubles draws can be created using the unsubscribed player function during the manual registration process, using the pairs name as the Player name (i.e. John Smith/Jane Smith). All draws are then created as 'Singles' draws.
Open Individual Competitions
Log in → left menu Individual Competitions → Admin. If you have district admin rights, go to Session Settings and select any club first.
Add Competition
Click Add Competition (top‑right). You’ll complete fields across several tabs.
General tab
- Event name: Include the club name (e.g., SquashGym Doubles). Important: Unlike composite singles and doubles tournaments, you can keep 'Doubles' in the event name. All events where Squash Doubles is selected as the Sport are automatically excluded.
- Sport: Select 'Squash Doubles'
- Detailed Description: Key info for entrants (e.g., ball type, marking / refereeing, check‑in times).
- Event Type: Usually Tournament (use Special Event for club challenges etc.).
- Competition Level (weighting): choose 'Open' if you only want Competitive Adult players to be able to register, or any other option for all subscribed players to be able to register. All matches are automatically excluded from SquashLevels so the weightings are void.
- Host: Host club.
- Clubs: Add host again + any additional venues if multi‑club.
Contact tab
Organiser, Phone, Email: Primary contact details for entrants and support.
Dates tab
- Start Advertising Date: When the event appears on the Competitions dashboard for players.
- Last Date of Registration: Final day for online entry via MySquash.
- Tournament Start/End: Playing dates; ensure they’re correct and chronological—these drive scheduling.
Other tab
- Default Game Length: Baseline duration (can be refined per court later).
- Fee: Entry fee amount.
- Mandatory Payment Online: Tick to require payment on registration (Stripe setup required; see below).
- Include Women / Include Men: Tick at least one (can be both).
- Open / Junior / Masters: Tag for homepage filtering.
- Terms & Conditions: Any rules/policies entrants must accept.
- Live Dashboard Layout: Choose layout for the tournament display (see Tournament Display).
- Show on Current Tournaments: Leave unchecked until draws/playing times are final; checking makes details visible after entries close.
- Show Current Players: Displays List registered players to entrants before closing date.
Save and review
After saving, the tournament public view appears (you can still edit via Competition Details).
If created in error
Tournaments cannot be deleted; rename to 'Ignore' and set entries closing in the past so it won’t surface.
Setting Up Online Payments (Stripe)
Create a Stripe account: https://www.stripe.com
Get API keys:
• Log into your Stripe account
• Click on ‘Developers’ on the bottom left
• Click on ‘API Keys’
• Click on ‘Create restricted key’
• Click on ‘Providing this key to another website’
• Click ‘Continue’
• Enter Name as Squash New Zealand
• Enter URL as https://www.squash.org.nz
• Click ‘Create restricted key’
• Complete verification process if required
• Click on the new API key to Copy to Clipboard
• Paste the key into a document to save for safekeeping, along with a new email which will be sent to SNZ and click ‘Done’
• Copy the ‘Publishable key’ as well and paste into the same email
• Send the email to support@squashnz.co.nz
Enable payment: In your event’s Other tab, tick Mandatory Payment Online if payment must be taken at registration.
Notes
- If Mandatory is enabled, players enter card details when they click Register for Tournament.
- On success, they get a confirmation email, and you see Payment Completed against their registration.
- Unsuccessful payments may appear for up to 60 minutes then drop; the player must re‑register.
- Refunds are not automatic when a player withdraws; process refunds in Stripe directly.
- Add a refund policy into the Terms & Conditions for the tournament.
- Stripe retains a fee (currently 2.7% + $0.30 per transaction per NZ pricing).
Refund Policy Template
- All tournament entry fees are payable at the time you register for the event. Entries will officially close on [insert date].
- If you withdraw before the closing date, you will receive a full refund, with the exception of the Stripe transaction fee, which is non refundable.
- Once entries have closed, all fees become non refundable, except in special circumstances approved at the discretion of the tournament organizers.
- Any refund requests made after the closing date must be submitted in writing to: [insert email or contact details].
Managing Entries
How Players Enter a Tournament
- Players log in and open Individual Competitions → Register. It should default to this page.
- From upcoming tournaments, they click your event to open the registration screen.
- Their contact details auto‑populate (edits here do not permanently update MySquash profile).
- Players select their playing partner from the drop-down list.
- They can add a comment to identify which draw they wish to participate in (e.g., "Please enter into Mixed Open" or other comments “Can’t play before 8pm Friday”).
- Click Register for Tournament.
- If payment is required, a card entry pop‑up appears; on success, registration completes.
- The event then appears at the top of their homepage with a ticket symbol.
- If their club membership / MySquash subscription has expired, they cannot enter until renewed.
- Withdraw before entry closing by re‑opening the tournament and clicking Withdraw from Competition (removes them from the registration list). A confirmation email is sent on initial registration.
How Tournament Directors Register Players
- Open Individual Competitions → Admin → Edit → Registrations → Register Player.
- In select player, type their name (e.g., “John”) and choose the correct person from the suggestions and also their playing partner. Their contact details auto‑populate.
- Click Save to add them to the registration list.
- Playing two draws: Players wishing to take part in two draws will need to be manually added for the second draw, they can only register themselves for one draw.
- Already registered warning: A pop‑up confirms if you’re registering a duplicate.
- Subscription Expiring (EXP): If their subscription will expire before start date, you’ll see Subscription Expiring; the player must renew membership.
- Unsubscribed / international players: Click unsubscribed player and fill in name, contact, gender.
Listing Registrations
- Edit your event → Registrations to see list (name, grade, level).
- Click Edit on an entry to view contact details, add comments, or Delete.
- Seeded: Shows Yes/No and Date seeded.
- No. of Registrations: Totals and male/female counts.
- Registration Report: Download all registration details to Excel (names, gender, contacts, levels, club, timestamp, comments).
Seeding Tournaments
- After entries close, click Seed.
- All entered players’ levels appear/update. You can manually assign levels for ungraded/international players.
- Pairs are seeded using the same method as interclub, ranking all players and adding the ranks to determined the highest to lowest ranked teams.
- Click Save to lock the current levels. You can seed multiple times, but levels refresh to the current day/time each time. Avoid reseeding after your advertised seed date unless necessary.
- The homepage Registrations shows seeded status and date.
Creating Draws
Adding Draws
Open Draws and Results → Add Draw.
Draw Name (4 chars max): e.g., MO (Men’s Open).
Description: Full name (e.g., Men’s Open).
Draw Type:
- Standard (8/16/32) — minimum 3 matches; elimination after 3rd loss (except 16‑draw 3rd/4th playoff).
- Monrad (4/16/32) — play out to final placing (e.g., 16‑draw → 4 matches per player).
- Round Robin (4/5/6) — all play all.
- Swiss (8/16) — grid‑style pairing over rounds.
- 16 without 3rd/4th — Standard 16 without the playoff.
- Draw 6 Type B — R1: 1v6, 2v5, 3v4; winners to RR of 3, losers to plate RR.
- Draw 6 Type C — two pools of 3 (A: seeds 1/4/5, B: 2/3/6), then finals for places.
Gender: Men, Women, or Mixed (use Mixed if any opposite‑sex players are included).
Draw Round: Use only when running two “tournaments” on the same day (e.g., Round 1 qualifiers then Round 2 main). Ensures grading order if multiple rounds occur on the same date. Not usually required.
Locked: Lock draws to prevent edits once the event starts.
Scoring Rules:
- Target Score: Par 11, 15, 7, or Infinite (club/social variants).
- Best of: 1/3/5/7.
- Winning Condition: Win by two or First to.
Save. Draws display under Draws and Results; click Edit to make changes.
Adding Players to Draws
Method A — Player Allocation
- Click Player Allocation.
- Select the draw you want to populate.
- Click populate → choose the top seeded pairing to auto‑select the right number of players for the draw size (or click individuals).
- Once full, remaining pairs are greyed out.
- Click Save to add highlighted pairs to that draw.
- Already‑placed pairs show the draw name beside their entry and appear greyed out.
Method B — Players page
- Open the Players button for a draw.
- Use dropdowns to assign a pairs to each draw position.
- For byes, leave position as Player not selected.
Notes
- EXP players (red “EXP”): Subscription expiring before start date; you cannot add them via allocator, but you can add them in the Players page dropdown.
- The Draws and Results homepage shows the number of players per division and total match count required.
Setting Up Courts
- Open Courts on the tournament dashboard.
- For each day:
- Set Start and End times for each court.
- Set Duration (length of each slot).
- Use the + button at the right of a court to create different slot lengths for different parts of the day (e.g., 30 min AM, 35 min PM).
- Enable each court (click the small red box) so it appears in the calendar.
- Click Generate Calendar (top‑right) → OK.
Changing durations later
- You must un‑allocate all matches before changing slot lengths; then click Generate Calendar again.
- To add more slots at the start/end without affecting scheduled matches, adjust in Courts and click Generate Calendar again.
Adding Matches to the Calendar
Open Calendar. If Calendar isn’t visible, go back to Courts and click Generate Calendar.
- Left pane: Choose the division (e.g., WO) to see required matches; first‑round matches are pre‑populated with player names.
- Right pane: The calendar shows courts and time slots per day. Use the arrow controls to move between dates.
- Allocate: Click a match on the left, then click a time slot on the right.
- A green tick appears beside the match.
- The match now shows on the calendar.
- Move match: Re‑click the match → choose a different time slot.
- Understand match IDs: e.g., WO 101 = Women’s Open, Round 1, Match 1; WO 202 = Round 2, Match 2.
Important rules
- Schedule in logical sequence (no Round 3 before Round 2).
- If you need to delete a draw, first unschedule all matches in that draw.
Match Counter
- Draws and Results shows required match totals per draw size (counts even if a match is a bye).
- Courts shows total time slots available per day.
- Ensure time slots ≥ total matches; add slots if needed.
Viewing Matches & Draw Diagrams
Viewing Matches
Go to Draws & Results and select the draw or click Matches for that draw.
You’ll see:
- Draw name (e.g., Mixed)
- Match ID (e.g., 101)
- Player vs Player
- Status (Not yet played / Played)
- Date & Time (if scheduled)
If a match isn’t scheduled, it auto‑populates at the event’s starting slot.
Draw Diagrams
- Click Diagram to download a PDF of the draw (ideal for printing and posting at the club).
- Diagrams update immediately as results are recorded; reprint each morning if needed.
- Players can also view diagrams under Individual Competitions → Draws & Results.
Result Entry
- Open Draws & Results → select Matches for the draw → choose the match.
- Confirm Player A/B and Match Date/Time.
- Enter game scores correctly in sequence.
- Status auto‑changes to Played when scores are entered; change manually if needed (defaults/byes).
Editing
Reopen the same match to update game scores or change Status; save.
Byes
To advance a player with a bye:
- Enter 15/0 15/0 15/0 to the advancing player (Player 2 remains No Player).
- Set Status to Bye and save.
Draw and calendar auto‑update, pulling players to the next round.
Replacement Pairs
First, register the replacement pair into the tournament. This may either be both players withdrawing, or a new player partnering with an existing player. Then either:
- Straight swap: In pairs for that draw, change the withdrawing pair's position to the new player.
- From match: In Matches, open the match and change the pair via dropdown to the replacement.
You do not need to unschedule matches to do either swap.
Live Scoring (Tournaments)
Accessing
From the tournament dashboard Scoring box:
- Copy Scoring URL — send to an email address that is accessible from your scoring tablet. Paste URL into a browser on your tablets/iPads.
- Display Scoring QR Code — scan/copy/print; post around the club or on marking sheets.
Using the Scoring Screen
Select the division and match.
Confirm server; scoring controls show:
- Right/Left serving side toggled by tapping the button.
- Tap the player name button to change between players.
- S marks the current server.
- Undo to revert the last action.
- Warm‑up timer (optional).
- Let/Stroke panel for calls (No Let, Yes Let, Stroke).
- Blue/Red buttons to award points.
After each game, confirm the prompt.
At match end, confirm and set Status.
Admins can override any live scoring entries if corrections are required.
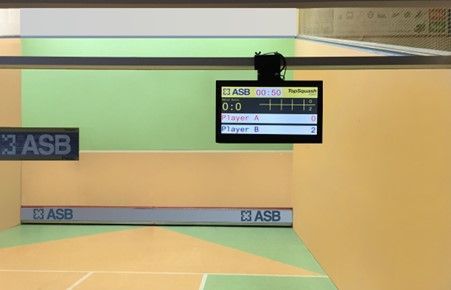
Tournament Display (Live Dashboard)
Prerequisite: Matches must be scheduled using Calendar.
Setup
- In the tournament, open Live Dashboard Links (each club gets its own link in multi‑venue events).
- Choose a layout:
- Upcoming — single list in time order.
- Upcoming by Court — grouped under each court.
- Set layout via Competition Details → Other → Live Dashboard Layout → Save.
Displaying
- Connect the tournament PC to a projector/TV (HDMI or wireless).
- Click Copy URL, paste into a new browser tab to open the dashboard.
- Use extended display mode and drag the dashboard tab to the second screen.
- Operate the tournament from the PC; the dashboard stays live on the big screen.
During the Tournament
- Matches move to Active Matches when live scoring starts.
- If not using live scoring, open the individual match and set Status to In Progress to move it manually.
- Scores generally update per point; if not, they update after each game.
- Completed matches appear in Completed Matches automatically (or after manual result entry if not using live scoring).
Troubleshooting
- Locked match in live scoring: Set Status back to Not Yet Played and Save to unlock.
- Long names truncated: Zoom out in the browser to reveal more of each name (depends on screen resolution).